

Deploy WordPress to AWS using Amazon Lightsail and Bitnami
Learn how to deploy WordPress on AWS with Amazon Lightsail and Bitnami. Discover simple setup steps, predictable costs, and key differences from EC2 for cost-effective hosting.
With countless WordPress hosting providers available, choosing between managed hosting and self-hosting can be challenging. While WordPress.com and other providers offer convenience, hosting your own WordPress site gives you complete control and potentially significant cost savings. Today, we’ll explore how Amazon Web Services (AWS) makes it simple to host your WordPress site with minimal effort using Amazon Lightsail and Bitnami templates.
Understanding EC2 vs Amazon Lightsail
What is Amazon EC2?
Elastic Compute Cloud (EC2) was one of AWS’s first offerings, allowing you to run virtual machines on public cloud infrastructure. Instead of building and operating physical servers in a datacenter, you can rent Amazon’s servers to run your virtual machines. This provides flexibility to rapidly scale your infrastructure up or down as needed.
However, EC2’s flexibility comes with cost unpredictability. You pay hourly for CPU usage, plus additional charges for IP addresses, DNS zones, bandwidth, and other resources. These costs can add up quickly and create unexpected bills.
What is Amazon Lightsail?
Amazon Lightsail offers a simpler, more predictable alternative to EC2. While it also runs virtual machines, Lightsail provides fixed monthly pricing that includes compute resources, bandwidth, IP addresses, DNS, and more. This predictability makes budgeting much easier and eliminates surprise charges.
Cost Comparison: Lightsail vs EC2
Amazon Lightsail Pricing
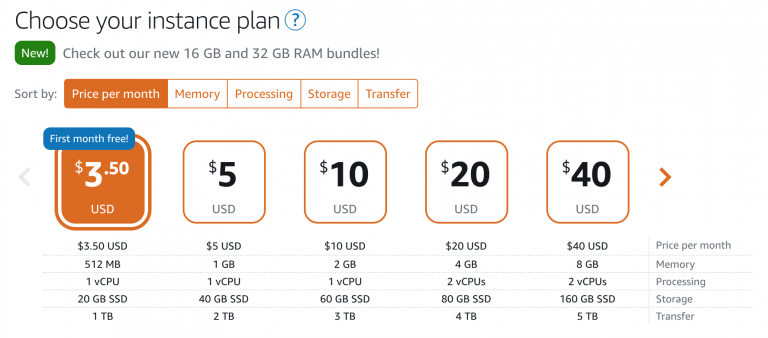
Lightsail’s transparent pricing structure makes it ideal for small to medium WordPress sites. The entry-level plan starts at just $3.50/month, with the option to double your memory for an additional $1.50/month. You can view current Lightsail pricing here.

Amazon EC2 Pricing
EC2 pricing is more complex and requires the AWS pricing calculator to estimate costs accurately. A t2.micro instance costs approximately $8.50/month on-demand, but can be reduced to $3.65/month with a 3-year upfront commitment.
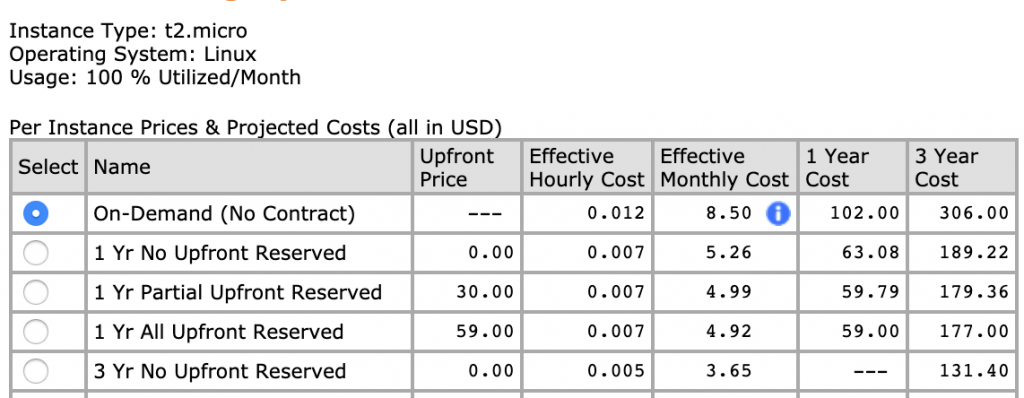
Cost Consideration: While EC2 can be cheaper with long-term commitments, remember that compute cost is only part of the total. EC2 requires additional payments for DNS, bandwidth, and other services that are included in Lightsail’s fixed pricing.
How to Deploy a Lightsail WordPress Instance
Step 1: Access the AWS Console
Begin by visiting the AWS console. If you don’t have an account, you can sign up here. Once logged in, click on the Services menu and select Lightsail under the Compute section.

Step 2: Configure SSH Keys
Before creating instances, add an SSH key to your account for secure access. Click the Account button in the top right corner, then select Account again, and navigate to the SSH keys tab.
You have two options:
- Create New: Generate a new SSH keypair. AWS stores the public key and prompts you to download the private key.
- Upload New: Upload an existing public key from your system.
# Generate SSH key on Linux/macOS
ssh-keygen -t rsa -b 4096 -C "[email protected]"

# The public key will be saved to ~/.ssh/id_rsa.pub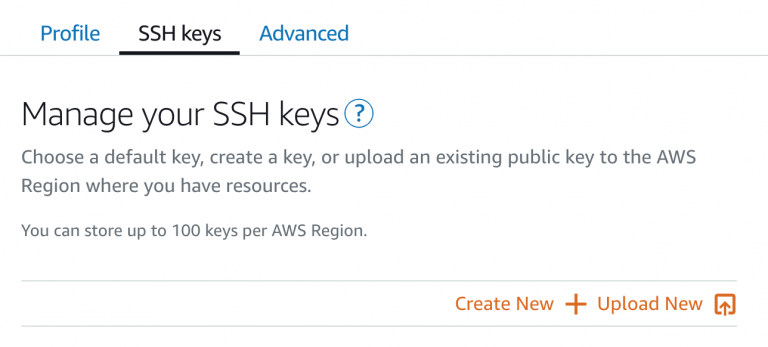
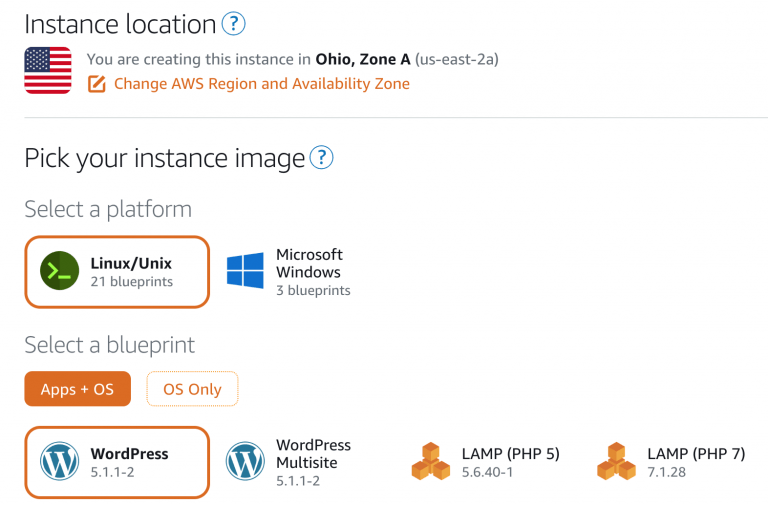
Step 3: Create Your Instance
Return to the Lightsail home screen and click “Create Instance” to launch the setup wizard. The process involves three main configuration steps:
- Region Selection: Choose from available regions (3 in the United States)
- Platform: Select Linux/Unix or Windows
- Blueprint: Choose between a clean OS or pre-configured applications like WordPress
Next, select your instance size based on your expected traffic and resource needs. Give your instance a descriptive name or accept the default, then click “Create Instance”.
Accessing Your WordPress Instance
After creation, your instance will appear as “Pending” while AWS provisions the resources. Once it changes to “Running,” wait an additional 1-2 minutes for the initial boot process to complete.

Connection Methods
You can connect to your instance using two methods:
- Browser Console: Click the orange button in the top right corner of the instance card
- SSH: Use the IP address shown in the bottom right corner with username “bitnami”
# SSH connection command
ssh -i ~/.ssh/your-key-name.pem bitnami@YOUR_INSTANCE_IP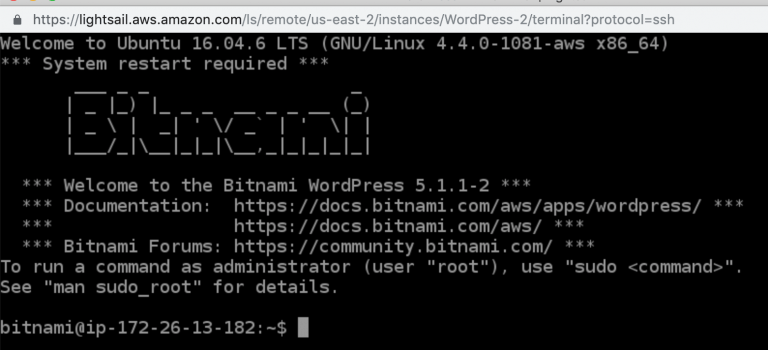
Retrieving WordPress Credentials
Bitnami automatically generates login credentials for your WordPress site. To retrieve them, connect to your instance and run the following command:
cat ./bitnami_credentialsThis command displays the default username and automatically generated password for your WordPress administrator account.

Essential Next Steps for Production
With your WordPress instance running, you can now access it via your instance’s IP address and log in with the retrieved credentials. However, several important steps remain for a production-ready site:
HTTPS Configuration
Enable HTTPS for secure communications using Let’s Encrypt. Bitnami provides detailed instructions for setting up Let’s Encrypt SSL certificates with their applications.
Content Delivery Network (CDN)
Small Lightsail instances have limited capacity for direct traffic. Implementing a CDN is essential for handling traffic spikes and improving global performance. Cloudflare’s free tier provides DNS hosting, CDN services, and basic SSL termination.
Pro Tip: While this setup provides basic encryption, implementing Cloudflare’s proxy service adds an additional security layer and significantly improves site performance through global caching.
Also consider reading our guide on troubleshooting HTTP error 500 in WordPress for common issues you might encounter.
Summary
We’ve successfully explored the differences between Amazon EC2 and Lightsail, highlighting how Lightsail’s predictable pricing and simplified management make it ideal for WordPress hosting. Through the step-by-step deployment process, we created a fully functional WordPress site using Bitnami’s pre-configured templates on AWS infrastructure.
Key takeaways from this deployment:
- Lightsail offers predictable monthly costs starting at $3.50
- Bitnami templates eliminate complex WordPress configuration
- SSH access provides full server control when needed
- Additional security and performance optimizations are essential for production use
Elevate Your IT Efficiency with Expert Solutions
Transform Your Technology, Propel Your Business
Unlock advanced technology solutions tailored to your business needs. At InventiveHQ, we combine industry expertise with innovative practices to enhance your cybersecurity, streamline your IT operations, and leverage cloud technologies for optimal efficiency and growth.