
Creating word clouds in Python is easy thanks to a few open source libraries. Today, we’ll use the wordcloud library and matplotlib to draw some word clouds that can enhance your data visualizations, presentations, and text analysis projects.
Word clouds are useful visualization tools for looking at the general theme of a document. As a document contains more instances of a given word, that word gets larger in the word cloud, and other words get smaller. They’re perfect for quickly identifying key themes in customer feedback, social media posts, research papers, or any text-heavy data.
Getting Started: Prerequisites
Before we get started, you will need to install the prerequisites by running the following commands:
pip3 install wordcloud
pip3 install matplotlib
If you don’t have pip installed, see our article on getting started with Python. There is a section on how to install pip.
Quick Tip: The wordcloud library we’re using was created by Andreas Mueller and is actively maintained with excellent documentation at GitHub.
Creating Your First Word Cloud
Let’s start with the simplest possible word cloud – just 5 lines of code:
from wordcloud import WordCloud
import matplotlib.pyplot as plt

# Create word cloud from simple text
text = "Python is great for data science. Python makes data visualization easy. Data science requires Python skills."
wordcloud = WordCloud(width=800, height=400, background_color='white').generate(text)

# Display the word cloud
plt.figure(figsize=(10, 5))
plt.imshow(wordcloud, interpolation='bilinear')
plt.axis('off')
plt.show()
That’s it! This code creates a basic word cloud where “Python” and “data” appear larger because they occur more frequently in the text.
Working with Text Files
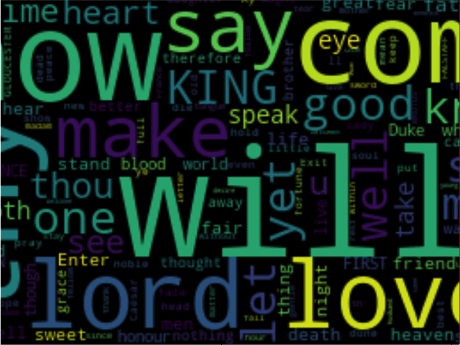
Downloading Sample Text
Before you can create your word cloud from a file, you need sample text. In this example, I’ll use the works of Shakespeare. Courtesy of Gutenberg.org, you can download the works of Shakespeare here.
If you don’t like the works of Shakespeare, you can also try the US Constitution by clicking here.
Creating a Word Cloud from Files
Below is the commented code for creating your word cloud. The code assumes that your text file is in the same folder as the Python script you are executing:
from os import path
from wordcloud import WordCloud
import matplotlib.pyplot as plt

# Set the directory containing your lexicon
dirname = path.dirname(__file__)

# Read the whole text
text = open(path.join(dirname, 'shakespeare.txt')).read()

# Generate a word cloud object
wordcloud = WordCloud(width=1200, height=600, background_color='white').generate(text)

# Plot it on the x and y axis
plt.figure(figsize=(15, 8))
plt.imshow(wordcloud, interpolation='bilinear')

# Turn off the axis - otherwise you'll see numbers around the word cloud
plt.axis("off")

# Show the word cloud
plt.show()

# Optionally save to file
wordcloud.to_file("shakespeare_wordcloud.png")
Customizing Your Word Cloud
The basic word cloud is just the beginning. Let’s explore how to make it more visually appealing and meaningful.
Removing Common Words (Stopwords)
Common words like “the”, “and”, “is” can dominate your word cloud without adding value. Here’s how to remove them:
from wordcloud import WordCloud, STOPWORDS
import matplotlib.pyplot as plt

# Read your text
text = open('your_document.txt').read()

# Add custom stopwords to the default set
stopwords = set(STOPWORDS)
stopwords.update(['will', 'shall', 'thou', 'thee', 'thy'])  # Add Shakespeare-specific words

# Create word cloud without stopwords
wordcloud = WordCloud(
    width=1200,
    height=600,
    background_color='white',
    stopwords=stopwords,
    max_words=100  # Limit to top 100 words
).generate(text)

plt.figure(figsize=(15, 8))
plt.imshow(wordcloud, interpolation='bilinear')
plt.axis('off')
plt.show()
Changing Colors and Styles
# Create a colorful word cloud
wordcloud = WordCloud(
    width=1200,
    height=600,
    background_color='black',  # Dark background
    colormap='viridis',  # Color scheme: try 'plasma', 'inferno', 'magma', 'cividis'
    max_words=150,
    relative_scaling=0.5,  # Make small words more visible
    min_font_size=10
).generate(text)
Advanced Techniques: Custom Shapes
One of the most impressive features is creating word clouds in custom shapes using image masks. This is perfect for presentations or branding.
from wordcloud import WordCloud
import matplotlib.pyplot as plt
from PIL import Image
import numpy as np

# Load your text
text = open('your_text.txt').read()

# Load and prepare the mask image
# Use a high-contrast image with white background
mask = np.array(Image.open('your_shape.png'))

# Create word cloud with custom shape
wordcloud = WordCloud(
    width=1200,
    height=800,
    background_color='white',
    mask=mask,
    contour_color='steelblue',
    contour_width=2
).generate(text)

plt.figure(figsize=(12, 8))
plt.imshow(wordcloud, interpolation='bilinear')
plt.axis('off')
plt.tight_layout(pad=0)
plt.show()
Pro Tip: For best results with masks, use images with clear white backgrounds and bold black shapes. Simple silhouettes work better than complex images.
Practical Examples
Let’s look at real-world applications where word clouds add value to your data analysis.
Example 1: Analyzing Customer Reviews
import pandas as pd
from wordcloud import WordCloud
import matplotlib.pyplot as plt

# Read customer reviews from CSV
df = pd.read_csv('customer_reviews.csv')
text = ' '.join(df['review_text'].dropna())

# Create sentiment-focused word cloud
# Remove neutral words to focus on sentiment
stopwords = {'product', 'item', 'ordered', 'came', 'got'}

wordcloud = WordCloud(
    width=1200,
    height=600,
    background_color='white',
    stopwords=stopwords,
    colormap='RdYlGn'  # Red-Yellow-Green for sentiment
).generate(text)

plt.figure(figsize=(12, 6))
plt.imshow(wordcloud)
plt.axis('off')
plt.title('Customer Feedback Overview', fontsize=20, pad=20)
plt.show()
Example 2: Creating from Word Frequencies
Sometimes you already have word frequencies from your analysis. Here’s how to use them directly:
# Create word cloud from frequencies
word_freq = {
    'Python': 100,
    'Data Science': 80,
    'Machine Learning': 75,
    'Analysis': 60,
    'Visualization': 55,
    'Statistics': 45,
    'Algorithm': 40
}

wordcloud = WordCloud(
    width=800,
    height=400,
    background_color='white'
).generate_from_frequencies(word_freq)

plt.figure(figsize=(10, 5))
plt.imshow(wordcloud)
plt.axis('off')
plt.show()
Troubleshooting Common Issues
“My word cloud is empty or has only a few words”
Problem: The text might be too short, or all words are being filtered as stopwords.
Solution: Check your text length and adjust stopwords:
# Check text content
print(f"Text length: {len(text)} characters")
print(f"Word count: {len(text.split())} words")

# Create word cloud with minimal filtering
wordcloud = WordCloud(
    stopwords=set(),  # No stopwords
    min_word_length=2,  # Include short words
    collocations=True,  # Include phrases like "data science"
    max_words=200
).generate(text)
“Special characters are breaking my word cloud”
Problem: Non-ASCII characters or encoding issues cause errors.
Solution: Handle encoding properly when reading files:
# Read file with proper encoding
with open('your_file.txt', 'r', encoding='utf-8') as file:
    text = file.read()

# Clean text before processing
import re
text = re.sub(r'[^\w\s]', ' ', text)  # Remove special characters
text = ' '.join(text.split())  # Normalize whitespace
“It’s too slow with large files”
Problem: Processing huge text files takes too long.
Solution: Pre-process the text to reduce size:
from collections import Counter

# For very large files, count words first
with open('large_file.txt', 'r', encoding='utf-8') as file:
    words = file.read().lower().split()

# Get top 1000 most common words
word_freq = Counter(words).most_common(1000)

# Create word cloud from frequencies (much faster)
wordcloud = WordCloud().generate_from_frequencies(dict(word_freq))
Important: For files over 10MB, always use the frequency method rather than passing raw text to avoid memory issues.
Best Practices and Tips
When to Use Word Clouds
✅ Good Use Cases:
- Quick visual summary of large text documents
- Presentation slides to highlight key themes
- Social media analysis and hashtag trends
- Customer feedback visualization
- Brand perception analysis
❌ When to Avoid:
- Precise quantitative analysis (use bar charts instead)
- Comparing multiple datasets (use other visualizations)
- When word context matters (word clouds lose context)
Design Tips for Professional Results
- Choose appropriate colors: Match your brand or use colors that convey the right emotion
- Limit word count: 50-100 words is usually optimal for readability
- Use high resolution: Set width and height to at least 1200×600 for presentations
- Consider your audience: Remove jargon or technical terms for general audiences
- Test different fonts: Some fonts work better for certain contexts
Quick Reference Guide
Here are the most commonly used WordCloud parameters for quick reference:
# Complete parameter reference
wordcloud = WordCloud(
    width=800,                  # Width in pixels
    height=400,                 # Height in pixels
    background_color='white',   # Background color
    max_words=200,              # Maximum number of words
    relative_scaling=0.5,       # Word size scaling (0-1)
    min_font_size=10,          # Minimum font size
    stopwords=STOPWORDS,       # Words to exclude
    colormap='viridis',        # Color scheme
    max_font_size=None,        # Maximum font size (None = automatic)
    font_path=None,            # Path to custom font file
    mask=None,                 # Image mask for shape
    contour_width=0,           # Width of mask outline
    contour_color='black',     # Color of mask outline
    prefer_horizontal=0.7,     # Ratio of horizontal words (0-1)
    random_state=None          # Seed for reproducibility
).generate(text)
Conclusion
Word clouds are powerful tools for visualizing text data and identifying patterns at a glance. With Python’s wordcloud library, you can create everything from simple text visualizations to sophisticated, branded graphics that enhance your presentations and reports.
Start with the basic examples, experiment with customization options, and gradually work your way up to advanced techniques like custom shapes and masks. Remember that word clouds are best used as a complementary visualization tool alongside other data analysis methods.
Next Steps
- Experiment with different color schemes to match your brand
- Try creating word clouds from social media data using APIs
- Explore combining word clouds with other visualizations in dashboards
- Consider using word clouds for regular reporting and monitoring
For more Python tutorials and data visualization guides, check out our other articles on Python programming and data science.
Elevate Your IT Efficiency with Expert Solutions
Transform Your Technology, Propel Your Business
Unlock advanced technology solutions tailored to your business needs. At InventiveHQ, we combine industry expertise with innovative practices to enhance your cybersecurity, streamline your IT operations, and leverage cloud technologies for optimal efficiency and growth.
Whether you’re analyzing data, building Python applications, or implementing business intelligence solutions, our team provides the technical expertise and infrastructure to support your data-driven initiatives.